Wednesday, January 30, 2013

Coffee Cake Hummus

I had the realization this afternoon that chickpeas are probably so-called because they resemble tiny roasted chickens after they have soaked. See?


Have you ever made this connection? I haven't until today and my mind is still reeling.

Ok, so in honor of my discovery, I'm going to throw at you an experiment. This experiment is titled Coffee Cake Hummus. Traditionally, hummus is made from pureed chickpeas and a paste made from sesame seeds called tahini. Usually, it's flavored with savory spices and you see combos of pre-packaged hummus flavored with things like roasted red pepper or lemon garlic. You don't see sweet hummus, though. Which I have always thought kind of weird, because chickpeas and other light-colored beans are pretty flavor neutral. Mixed with peanut, almond or cashew butter, you'd have a pretty solid base for almost any mix-in. 

I researched dessert hummuses and discovered a sort of cottage industry of food bloggers inventing their own nut-based hummus recipes. The recipe I'm modifying today is Chocolate Covered Katie's recipe for Snickerdoodle Dip. There are no major complaints with her recipe as is, except I'm not going to use canned beans (which means less salt), I'm going to tweak a few basic ingredients and I'm going to omit baking soda (the extra sodium doesn't seem to be necessary).

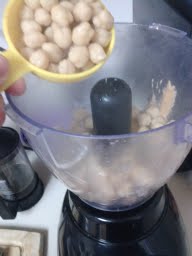
In order to make this recipe, I strongly recommend buying a package of dried chickpeas and soaking them ahead of time. A bag of dried garbanzo beans costs $1.29 here in Somerville and makes about 5-6 cups prepared (or the equivalent of 3 cans).


Cover them with water overnight in a bowl in your fridge. They will pretty much triple in size as they rehydrate, so make sure you leave lots of room and use lots of water--more than you think they can use. Then rinse them off, covering them with fresh water in a large stock pot. Then boil according to the directions on the back of the bag (Or until they're tender. This isn't rocket science.) 


Coffee Cake Hummus

3 cups of prepared beans
1 half of a small apple, diced (or use 1 tbs. applesauce)
3 tbs. cashew butter (or peanut butter. Or almond butter. It all tastes fine.)
1/2 to 3/4 cup amber honey
2 tsp. vanilla extract 
3 tsp. cinnamon
pinch of sea salt


Basically, you dump all of this in a food processor and blend. I don't have a food processor. I have a food-processor-like attachment that came with my blender. It works fine. Me being single, I don't have the fancy-ass kitchen equipment people give you when you get married that ends up on top of the kitchen cabinets alongside the crepe-maker and the fondue set you registered for during your pre-matrimonial powertrip. Yeah, you know who you are. Or at least I know who you are.

I'd take a picture of this, but it's not photogenic. It's brown. Whatever.

You eat this with apple slices. And your fingers. I promise to keep working with this base recipe. It's good now and a lot better for you compared to, say, eating frosting out of a can. It's like high-fiber nature frosting you eat out of a blender, which I console myself is better than that incipient drinking problem that creeps up behind me every few weeks and whispers, "'sup?" 

Tuesday, January 29, 2013

Vegetarian Peanut Crack Sauce

My friend Madeline originally turned me onto this recipe a few years ago. I think when I read it, it was relegated to "stir-fry sauce" and not much more. But then I adopted it like a stray kitten, nursing it on a steady diet of encouragement steroids so it could be so much more than just stir-fry sauce. Now it's crack sauce. It's the sauce you bust out when you want to impress people. It's the sauce you give away on Christmas and people throw aside their iPads and Pokemon cards, grabbing the jar with sparkles in their eyes while saying, "God bless you, Holly. God bless you! May your womb be ever fertile" Yeah. That's how good this fucking sauce is.  I'm not even remotely exaggerating.People get weird when they receive awesomesauce. 

Vegetarian Peanut Crack Sauce


1 cup unsalted, unsweetened peanut butter (all-natural)
1.5 tbs. minced garlic
2 tbs. soy sauce
2 tbs. brown sugar
2 tbs. red curry paste
1 tbs. ground ginger
Sriracha sauce to taste
1 cup very hot water

Blend all these ingredients together using an immersion blender. Store in the fridge. It won't last long, but it gets better with a few days of sitting sassy in your fridge. 

USE ON EVERYTHING. Tofu, peppers, whole-wheat noodles, buckwheat noodles, udon, brown rice, chickpeas, beans, shhhhh people tell me they eat this on English muffins in the morning. Try it. You'll figure it out.


Stupid Easy Refrigerator Pickled Peppers

This recipe came as the result of an experiment with refrigerator pickled carrots. While that was good, this was better. And easier. And less salty.

I love red peppers. I eat at least several pounds a week. So when I realized I could just take the brine from the carrot recipe, pour it over a jar of sliced up peppers and toss it in the fridge, I was delighted. I love stupid easy things. 

Refrigerator Pickled Peppers
5-6 Red Peppers, deseeded and cut up into slices
2 Cups of warm water
3 Cups of white vinegar
1 Cup of Sugar (I use white, but you could use brown, too.) 
1 tsp. salt
Arrange the pepper slices in a tupperware container or jar like so.


Mix the pickle brine by adding the water, salt, vinegar and sugar until the sugar dissolves. Pour over the  pepper slices. Seal it up and throw in the fridge. Wait for at least 24 hours before you eat them. They will be tasty and you will be happy.


Guest Entry: Bring us a Shrubbery!

Inspired by yesterday's recipe for Bourbon-infused honey, my friend Daniel Scarnecchia wrote up this entry today about the Shrub. Curious? Yeah. I am. What the fuck is a Shrub?

A recent article in The Atlantic noted the collapse of soda versus coffee consumption over the last decade. New York City has banned the sale of oversized soft-drinks and sugary beverages have been targeted as the cause of a host of ailments, particularly childhood obesity. While it is true that American’s consume far too much sugar and that soft drinks make it insidiously easy to do so, a cold, carbonated, and sweetened drink is still quite refreshing.

The shrub is a beverage made from vinegar, fruit, and sugar that developed in the colonial-era United States. With its roots in food preservation, it largely disappeared following widespread consumer refrigeration in the early 20th century. However, in the last year it has developed a small but devoted following on the craft cocktail scene. While the acidity of the shrub make it an excellent addition to cocktails, it also makes for a tasty soft-drink alternative which is both is far healthier than soda, and easy and cheap to make.

So what do I need? The basic ingredients are a fruit of your choice, white sugar, and vinegar. Apple cider vinegar is usually a good starting point, although balsamic and white balsamic work very well too (n.b. white distilled vinegar is a cleaning supply and not to be used in cooking.) You will also need cheese cloth or a fine wire mesh strainer and a mason jar and while not strictly necessary, a wide mouth canning funnel will certainly make your life easier and keep your counters cleaner. Below is the recipe and directions for an Apple-Ginger Shrub, with which I have had success. The basic template will be the same for any fruit: 1 part fruit, 1 part sugar, 1 part vinegar.
Apple-Ginger Shrub (yields: ~1 pint) 
¾ cup apples, chopped 
¼ cup fresh ginger, peeled and chopped 
1 cup of sugar 
1 cup of apple-cider vinegar.
After chopping the fruit, place it in a bowl and cover it with the sugar. Cover the bowl and let sit for 24 hours. This process is called maceration and the sugar will draw the liquid and flavor out of the fruit. After 24 hours, drain the resulting syrup into your mason jar through the cheese cloth or strainer. As the syrup is thick, this process might take some time, as you want to allow as much as possible to make it through. Discard or set the fruit aside.

Add to the syrup 1 cup of vinegar and mix well. Seal the jar and let sit on a counter top for approximately 2-3 days. With this particular recipe adding a cinnamon stick or a small number of cloves to the mix (for just a day or two) will aid in developing a more complex flavor. This is purely optional, and the reader should feel free to play around with different spices.

After 2-3 days the shrub will be ready to use. The fruit and sugar will have balance out the acidic bite of the vinegar, while developing a flavor that is sweet, but not too sweet.

Drinking Vinegar

Two tablespoons of your shrub to 10-12 ounces of club soda will yield a delicious carbonated soft-drink, which will weigh in at about 55 calories and only about ⅓ of the carbohydrates that a 12 ounce Coke or Pepsi would yield.

 A couple of notes for the reader: your first reaction upon smelling this mixture may be to question why you’re drinking easter egg dye. Vinegar is something we’re unaccustomed to drinking, so I urge you taste it regardless of the intensity of the vinegar smell. You will not be disappointed.

Vinegar contains acetobacter and most fresh fruit carries a variety of wild yeasts. They are perfectly safe to consume, but ultimately will limit the shelf life of the shrub as the yeast turns the sugar into alcohol and the acetobacter turns the alcohol into vinegar. How long that is, I do not know. I have a pair of shrubs that have been out on my counter for several months and are still quite drinkable, although they’re developing more of a bite as they age. Refrigeration will retard this process but not halt it entirely. If you really want to, you can probably sulfate it, but I’m not recommending that.

Monday, January 28, 2013

DIY Honey-Infused Bourbon Whiskey

Do you like deliciously sweet, tasty alcohol? Yes. You do. Shut up. It wasn't really a question.

Today I'm going to teach you how to infuse bourbon whiskey with honey. This isn't hard. You don't need to grab your dangerpants. Leave them in the closet.

For this recipe you need three things: delicious runny honey, slightly higher-than-bottom-shelf bourbon whiskey, and a mason jar (Or whatever. I don't care what you keep your booze in. Who am I to judge?)

So the ratio to this is basically 4:1.You can fuck with the ratio depending on how sweet and honey-like you want your alcohol to be. The way I prepare it, it will basically be like delicious alcoholic honey that can be poured into hot tea or taken straight the way I would imagine I would take it if I were an outlaw in the old west trying to prove my masculinity to others except mine has tasty honey in it and theirs didn't.

Ingredients:


  • 1 cup bourbon
  • 1/4 cup honey


Microwave your honey if it isn't already super runny. The Honeyman puts some runny honey out there on the shelf, people. FYI.

Then you pour it all into that jar. And shake it up. And put it in your fridge. Then shake it again later when you're tired and keep opening the fridge hoping something will miraculously appear there to eat since the last time you opened the door but it hasn't. Do this for at least 24 hours before you drink it. The longer it sits, the better.


When you're done, it should look like this. It looks great, doesn't it? It does. It looks like delicious honey collected by the drunkest bees in all the land.

Introductory Notes

Hi! This is my blog where I teach you how to eat better. I have a really simple philosophy when it comes to eating and it's that you should be eating as many vegetables and fruits as you can afford. Mostly, I think this way because I've helped a lot of people transition from crap-based diets to plant-based diets and watched them lose weight and get in shape for years now. I can't help but think this is one of the best things I can do for anyone, regardless of what I do professionally. In fact, I guarantee this is better for people than what I do for a living.

For whatever it's worth, I'm a grad student and don't buy organic anything. I agree with many experts that the benefits of eating organic versus non-organic plants exist, but are negligible. Mostly, I just think eating non-organic produce is still better than eating none. And most people eat almost none. So I pick my battles where I feel they're most worth fighting.

Nutritionally speaking, America eats like shit. We eat too much meat. We eat too many grains. We all know that part. And we know that we should be eating more plants, but god, who has the time? Who has the money?

Make the time, stupids. There's nothing more important in your life than NOT getting diabetes and NOT getting cancer because you said in your twenties and thirties you didn't have the time to learn to feed your body correctly but somehow had the time to watch Once Upon the Time. Come on. The acting on that show is horrible. Stop it.

And as for money? I'll teach you how to save money. That's another thing I'm ridiculously good at. Once you slash your meat budget and stop buying fresh produce that you should be buying frozen, you'll be amazed how much more money you have to buy things like tastier honey (seriously, try to buy local raw honey because bees are magic and it's the closest thing to legal crack money can buy).

So here's is my blog where I will experiment with simple, mostly plant-based recipes. Most of my recipes will pass two criteria: they are made using cheap, affordable ingredients (i.e. no saffron unless it's raining from the sky) and they are mostly made with clean-eating principles in mind (i.e. mostly plants sans grains).  Actually, I'm totally channeling my late grandmother when I say this: I'm not a professional chef.  But I know how to fucking feed you. So shut up and eat it.